
UNDERSTANDING YOUR JACKSON PRATT (JP) DRAIN

Jackson-Pratt (JP) Drains are used to eliminate surplus fluids, including blood and other substances, from a surgical area.
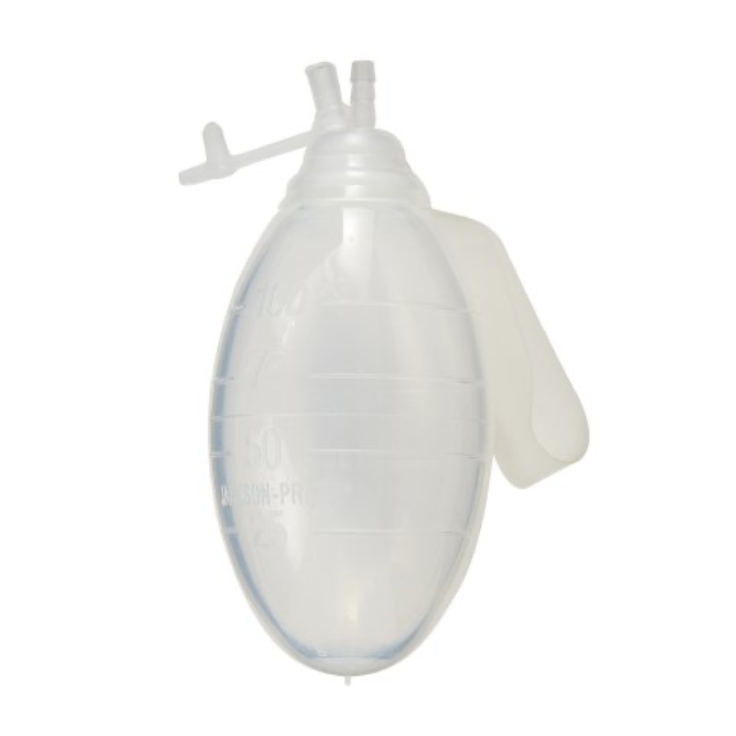
The use of a JP Drain following surgery is geared toward averting complications and advancing the healing process. Composed of two parts, a flexible tube inserted into the surgical incision and bulb reservoir to collect the drainage.
Below we will walk you through how to use and care for your JP Drain.
How do JP Drains Support the post-surgical recovery process?
-
Following plastic surgery procedures such as breast augmentation, abdominoplasty, or liposuction, fluid accumulation can occur in the surgical site, leading to swelling and discomfort. JP drains are instrumental in preventing this accumulation by removing excess fluids and blood that can potentially hinder the healing process.
-
Seromas are common complications in plastic surgery. Seromas are collections of clear fluid that can cause pain, swelling, and delay the healing process. JP drains aid in preventing these complications by continuously evacuating excess blood and fluid, reducing the likelihood of seroma formation.
-
Infections can be a significant concern after plastic surgery. The presence of JP drains allows medical professionals to closely monitor the fluid being removed. Any sudden changes in color, consistency, or odor of the drained fluid can indicate the presence of infection, enabling early detection and prompt intervention.
-
By effectively draining excess fluid and blood from the surgical site, JP drains help speed up the recovery process. Patients who undergo plastic surgery with the aid of JP drains often experience reduced swelling and discomfort, facilitating a faster return to their normal daily activities.
Caring for your JP Drain
Maintain Sterile Conditions: When handling the drainage system, it's crucial to maintain sterile conditions. Avoid touching the exposed end of the tubing, as well as the inside of the drainage bulb or collection chamber.
Record Output: Keep a record of the output from the JP drain. This typically involves measuring the amount of fluid collected in the drainage bulb and noting its characteristics, such as color and consistency. Record this information at regular intervals, as instructed by your healthcare provider.
Empty the Drainage Bulb: When the drainage bulb gets full, or as per your healthcare provider's instructions, it's time to empty it. To do so follow these steps:
Gather the necessary supplies: clean gloves, a clean measuring cup, and a disposable plastic bag.
Put on clean gloves to maintain a sterile environment.
Open the stopper or cap on the drainage bulb's port.
Hold the drainage bulb over a clean measuring cup and gently squeeze it to empty the fluid into the cup. Note that some JP Drains have measurement gauges visible on the bulb. Allowing the fluid to settle after opening the bulb and removing the negative pressure will allow you to record the drain output.
Note the amount of fluid collected.
Dispose of the collected fluid according to your healthcare provider's recommendations. This may involve pouring it down the sink or toilet, or disposing of it in a specific manner.
Ensure Proper Suction: Achieving optimal suction for proper fluid drainage is attained by compressing the drain bulb and sealing the top to create an airtight enclosure.
Secure the Drain: Ensure the tubing and drain site are securely anchored. The tube should not be pulled or tugged accidentally. Use surgical tape or adhesive strips as recommended by your healthcare provider to secure the tube.
Prevent Clogging: To prevent clogging of the drain, it's important to maintain the integrity of the tubing. Do not kink or twist the tubing, and keep it as straight as possible. Make sure that clothing or bed linens do not press on the tubing. In the event of blood or fluid clotting in the tube, use two fingers to push the blockage out towards the bulb. If you are unable to remove the blockage or if the drainage becomes slow, contact your healthcare provider for guidance.
Maintain Clean Dressings: Keep the insertion site clean and dry. Follow your healthcare provider's instructions for changing dressings and cleaning the area around the drain site.
Follow Medical Instruction: Adhere to any specific care instructions provided by your healthcare provider. This may include adjusting the suction level on the drainage bulb or changing the drainage system entirely.
When do I know that my drain is ready to be removed?
The timing of drain removal usually relies on the volume of output. As your body progresses in its healing journey, it will naturally start to metabolize the surplus fluid. When the output level falls below a predetermined threshold, your attending physician will likely proceed with the removal of the drain.
If you are planning to have surgery performed out of state, follow the link to learn about the Best Practices When Traveling For Surgery.
PRO-TIP: THE HEALING TIMELINE
Recovery after surgery is a complex process influenced by factors like the type of surgery, your health, and your body's natural ability to heal. Initially, the focus is on the first few weeks, known as the acute healing phase. During this time, your body's natural processes like inflammation and tissue repair are crucial for healing the surgical area. Over time, pain and swelling tend to decrease, it's important to understand that complete recovery is gradual, and some surgical areas may improve for months or even years. Regular follow-up appointments with your board certified plastic surgeon is vital to track progress and address any concerns during your recovery.